Introduction:
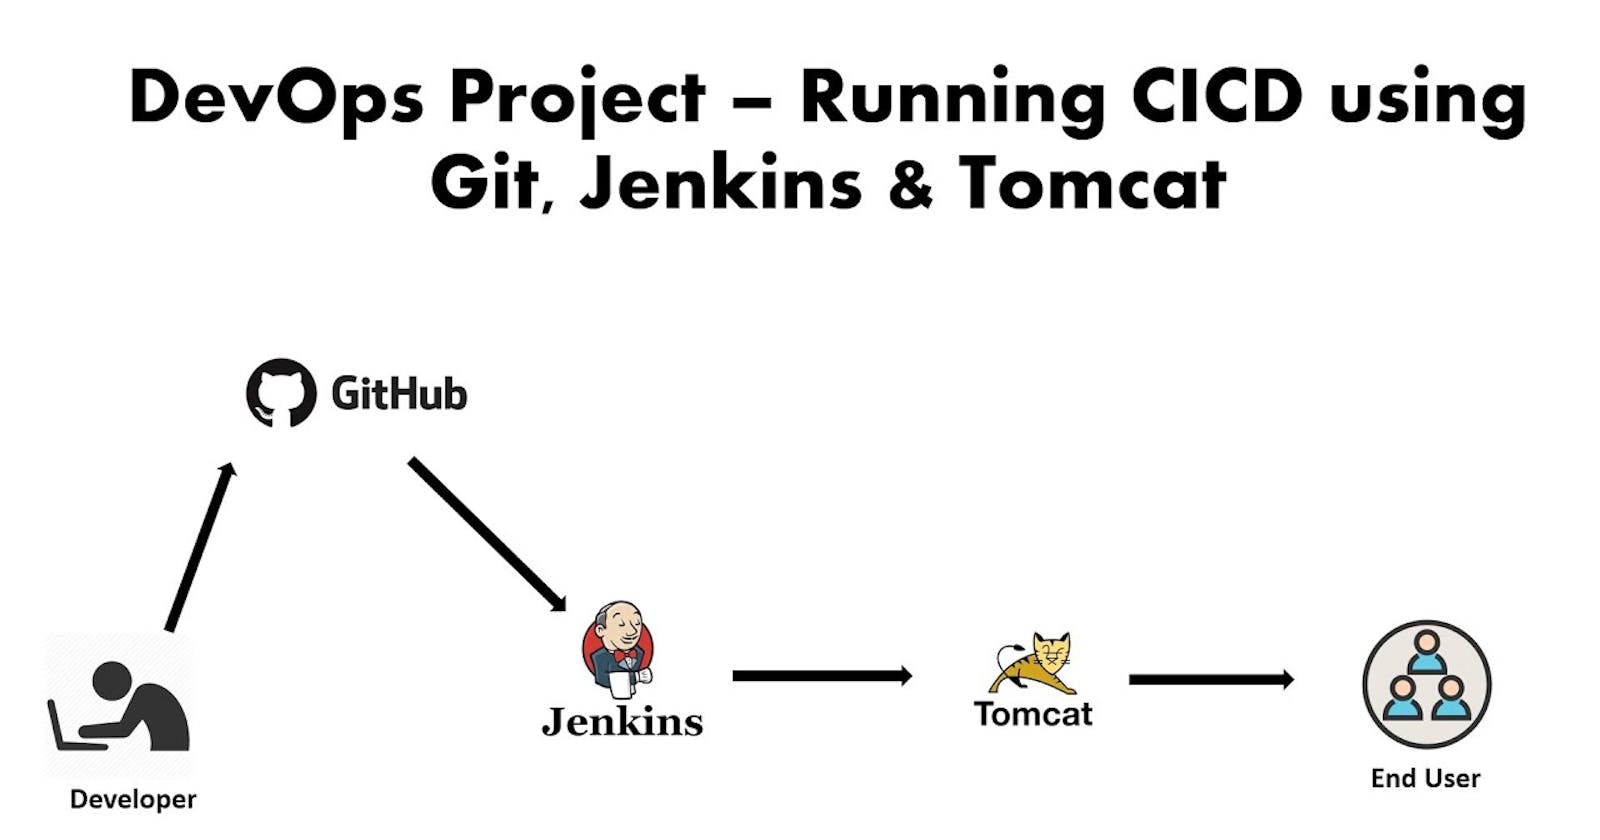
Jenkins is a powerful open-source automation server that enables developers to automate the build, test, and deployment process for software projects. In this blog post, we will guide you through the step-by-step process of setting up a Jenkins job to automate the build, test, and deployment process for a simple web application.
Prerequisites: Before we begin, make sure you have the following components ready:
A web application codebase hosted on a Git repository.
A test server where you can deploy the web application for testing.
Access to a server where you can set up Jenkins.
- Install Jenkins on a server or a machine of your choice.
sudo apt update
sudo apt install openjdk-17-jre
java -version
curl -fsSL https://pkg.jenkins.io/debian-stable/jenkins.io-2023.key | sudo tee \
  /usr/share/keyrings/jenkins-keyring.asc > /dev/null
echo deb [signed-by=/usr/share/keyrings/jenkins-keyring.asc] \
  https://pkg.jenkins.io/debian-stable binary/ | sudo tee \
  /etc/apt/sources.list.d/jenkins.list > /dev/null
sudo apt-get update
sudo apt-get install jenkins


sudo cat /var/lib/jenkins/secrets/initialAdminPassword
If you don't have an SSH key pair, generate one using the following command:
ssh-keygen

Now, you can proceed to add the SSH key to your GitHub and Jenkins accounts:
Click on "SSH and GPG keys" in the left sidebar.

Click on "New SSH key" or "Add SSH key."
Paste the contents of your public key into the "Key" field.

Click "Add SSH key" to save.

For Jenkins:
Go to "Manage Jenkins" > "Manage Credentials" > "Jenkins" (or "Global") > "Add Credentials."


- Choose "SSH Username with private key" as the kind.

- Provide a unique ID and Username for the SSH key.

- In the "Private Key" section, select "Enter directly" and paste the contents of your private key (id_rsa).

Now, Ubuntu machine is set up with SSH keys for GitHub and Jenkins, allowing you to securely interact with these services. Make sure to use the SSH URLs when interacting with Git repositories hosted on GitHub.
To install the Apache Tomcat server on Ubuntu, follow these steps:
Update Package List: Open a terminal and update your package list to ensure you're installing the latest version of software packages.
sudo apt updateInstall Java: Apache Tomcat requires Java to run. You can install OpenJDK, which is an open-source implementation of the Java Platform, Standard Edition.
sudo apt install default-jdkDownload Tomcat: Visit the official Apache Tomcat website (tomcat.apache.org) to find the latest version's download link. Copy the download link for the Binary Distribution Core.
wget https://dlcdn.apache.org/tomcat/tomcat-9/v9.0.78/bin/apache-tomcat-9.0.78.tar.gzExtract Tomcat:
 tar -xzf apache-tomcat-9.0.78.tar.gz
 sudo mkdir /opt/tomcat
 sudo mv apache-tomcat-9.0.78/* /opt/tomcat/
 sudo nano /opt/tomcat/conf/tomcat-users.xml
Add the following user configuration details, just before the </tomcat-users> closing tag and save the file (Ctrl+O to save).
 <role rolename="manager-gui"/>
 <user username="manager" password="anyPassword" roles="manager-gui"/>
 <role rolename="manager-script"/>
 <user username="manager" password="anyPassword roles="manager-script"/>
 <role rolename="admin-gui"/>
 <user username="admin" password="anyPassword" roles="admin-gui, manager-gui"/>
Finally, you can start the server, for this navigate to the bin folder and execute the startup script.
 cd /opt/tomcat/bin/
 sudo ./startup.sh


Install and configure necessary plugins in Jenkins
Navigate to "Manage Jenkins" > "Manage Plugins" > "Available" tab.

Install the following plugins (if not already installed):
Git Plugin: For integrating with your Git repository.

Maven Integration Plugin: For building the web application using Maven

Deploy to Container: For Deploying the web application using Tomcat

Jenkins will prompt you to restart after installing the plugins.

- Email Extension Plugin: For sending notifications via email.

Configure Jenkins to recognize Maven:
Go to the Jenkins dashboard.
Navigate to "Manage Jenkins" > "Global Tool Configuration."
Scroll down to the "Maven" section.
Click on "Add Maven" to configure a new Maven installation.
Enter a name for the Maven installation (e.g., "Maven 3.9.4") and select the appropriate Maven version that you installed in Step 1.

Click "Save" to apply the configuration.
Configure the email settings:
Ensure that you have correctly configured the email notifications in Jenkins. Go to "Manage Jenkins" > "Configure System" and scroll down to the "E-mail Notification" section. Double-check the email server settings, including the SMTP server, port, and any authentication credentials required.


Create a Jenkins job to pull the code from the Git repository
Go back to the Jenkins dashboard and click on "New Item" to create a new Jenkins job.
Enter a name for your job and select the "Freestyle project" option, then click "OK."

In the job configuration page, under the "General" section, check the "GitHub project" option.
In the "Project URL" field, enter the URL of your GitHub repository. For example, if your repository is hosted at https://github.com/eddzaa/NCPL.git, then you should enter that URL in this field.
In the job configuration page, under the "Source Code Management" section, select "Git."
Provide your Git repository URL and any required credentials to access the repository.

Configure the Build Triggers appropriately in your Jenkins job to determine when the job should be triggered


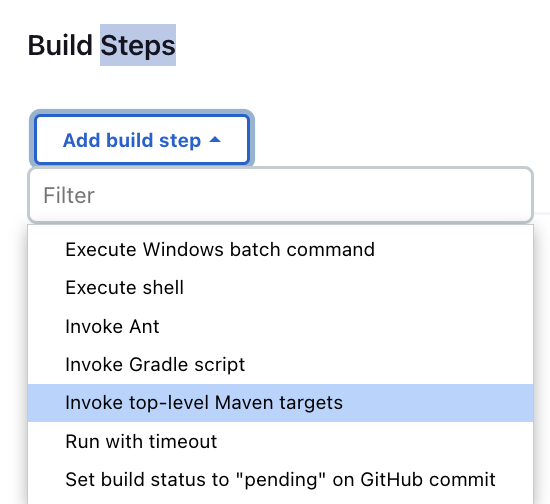
In the job configuration page, under the "Build Steps" section, click "Add build step" and select "Invoke top-level Maven targets."

Select Maven Version and Set the "Goals" field to "clean install" (or any other Maven goals you need for your project).

In the job configuration page, under the "Build Steps" section, click "Add build step" and select "Invoke top-level Maven targets."

Select Maven Version and In the "Goals" field, specify the Maven command to run your tests. For JUnit tests, use test:

Configure the job to deploy the web application to a Tomcat server.


Set up notifications to be sent when the build, test, or deployment process fails
In the Jenkins job configuration page, scroll down to the "Post-build Actions" section.

Click on "Add post-build action" and select "Editable Email Notification."

Configure the email settings:

To manually trigger the build, locate and click on the "Build Now" button. This will initiate the build process for your web application.


http://44.202.57.185:8009/webapp/
Based on the output, the CI/CD pipeline successfully executed the Maven build, automated testing, and deployment processes. The pipeline seamlessly completed the following essential steps:
Set up a Jenkins server.
Install and configure any necessary plugins.
Create a Jenkins job to pull the code from the Git repository.
Configure the job to build the web application using a build tool such as Maven.
Configure the job to run automated tests on the web application.
Configure the job to deploy the web application to a test server.
Set up notifications to be sent when the build, test, or deployment process fails.
That's it! A basic CI/CD pipeline for your simple web application using Jenkins. As project evolves, we can customize and enhance this pipeline to suit your specific needs.
Happy automating!
